So I scored a chest freezer for Christmas, and was going to convert it into my beer-dispensing unit. Before I begin I wanted to get everyone’s advice and what you would have done differently, would do again, or wouldn’t have done at all.
Here is a list of what I have in mind:
-Put the whole unit on wheels so I can move it around easily for cleaning.
-Install a 2”x6” collar under the lid so it lifts with the lid to avoid taps and lines getting in the way when lifting kegs in and out.
-Either installing a thermowell in the collar for the temp. controller or running the probe for the temp. controller into a small thermos of water at the base or on the shelf of the chest freezer.
-Using a digital or analog temp. controller.
-Recommended spacing between faucets.
I’m sure this just scratches the surface, so please fire away.
Brian
Chest freezer kegerator Do's & Don’ts
Moderator: Post Moderators
-
BARL Brewing

- Posts: 157
- Joined: Mon Mar 08, 2010 10:49 pm
- Location: Corona, Ca

Re: Chest freezer kegerator Do's & Don’ts
I would suggest running the collar pieces thru a jointer to make the sealing surface very flat. Otherwise leaks may occur. Definitely go with the digital temp controller
Chris aka Dr Dually
drdually@att.net
Life is tough. It is even tougher when you are stupid. John Wayne
Bottled and enjoying: Nada, zip
Kegged: English Brown, American Amber, Double Barrel Ale
Next up: Kolsch
drdually@att.net
Life is tough. It is even tougher when you are stupid. John Wayne
Bottled and enjoying: Nada, zip
Kegged: English Brown, American Amber, Double Barrel Ale
Next up: Kolsch
Re: Chest freezer kegerator Do's & Don’ts
#1: You may be able to avoid an external temp controller. Check this out:
http://www.homebrewtalk.com/f51/guide-s ... ol-249612/
Worked for me. Mine holds roughly 38-40 degrees pretty constantly.
#2: You're going to want at least one internal fan for air circulation, and some sort of a dehumidifying solution. I use 3 PC case fans for circulation, and the Eva-Dry 500 from dehumidifier.
#3: Run longer beer line than you think you need. Most online calculators tell you that you only need 5' for a properly balanced draw. I don't believe it. Plan on starting with at least 10' per tap (more if you can). You can always cut it down. But you want to avoid having pours full of foam.
#4: I've heard minimum spacing should be ~4 inches. I went with 5" because I had enough room to do so, and it's plenty.
Brad
Re: Chest freezer kegerator Do's & Don’ts
Good idea on the fans, An old pc power supply will be enough to drive 3 and keep everything circulating nicely. The power supply could also be wired to operate when temp controller turns compressor onbwarbiany wrote:#1: You may be able to avoid an external temp controller. Check this out:
http://www.homebrewtalk.com/f51/guide-s ... ol-249612/
Worked for me. Mine holds roughly 38-40 degrees pretty constantly.
#2: You're going to want at least one internal fan for air circulation, and some sort of a dehumidifying solution. I use 3 PC case fans for circulation, and the Eva-Dry 500 from dehumidifier.
#3: Run longer beer line than you think you need. Most online calculators tell you that you only need 5' for a properly balanced draw. I don't believe it. Plan on starting with at least 10' per tap (more if you can). You can always cut it down. But you want to avoid having pours full of foam.
#4: I've heard minimum spacing should be ~4 inches. I went with 5" because I had enough room to do so, and it's plenty.
Chris aka Dr Dually
drdually@att.net
Life is tough. It is even tougher when you are stupid. John Wayne
Bottled and enjoying: Nada, zip
Kegged: English Brown, American Amber, Double Barrel Ale
Next up: Kolsch
drdually@att.net
Life is tough. It is even tougher when you are stupid. John Wayne
Bottled and enjoying: Nada, zip
Kegged: English Brown, American Amber, Double Barrel Ale
Next up: Kolsch
Re: Chest freezer kegerator Do's & Don’ts
I think you've got a pretty good start. FYI my kegerator is pictured in the upper right corner of this page. Unfortunately my build thread was lost in the great brewcommune website crash. But there are some pics.
For wheels, I built a frame from angle iron and set the freezer inside. Be sure to leave a notch for the freezer drain plug (ask me how I know )! See pics here and here.
For Temp I did the standard Ranco treatment. The temp probe goes into a gallon jug of water with a thermowell.
I did an external CO2 tank (I added to my rolling frame later) with multiple regulators to differing pressures.
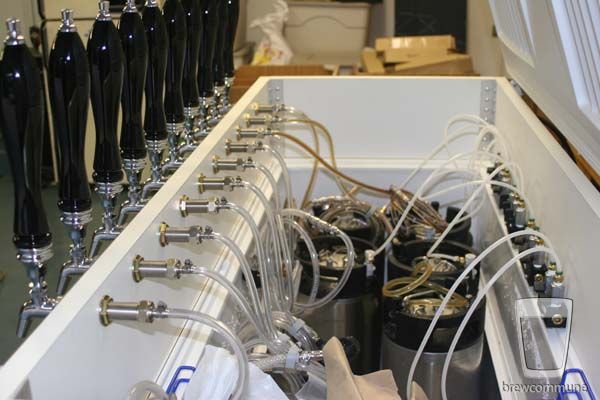
My kegerator has 4 regulators and 4 manifolds. You can see the regs here and the manifolds here.
I made my collar out of 1" white melamine. Internally I used 1" aluminum angle for braces. I agree with Dr. Dually on getting flat surfaces. After ripping the collar on the table saw, I edge banded the collar. No need to insulate and no sealing issues. I put aluminum 1/4" dowels in the corners and drilled holes in the top of the chest. That is all that holds mine together ... no sealant, glue or other bracing ... just gravity (1" melamine is _HEAVY_). See the collar being assembled here. And here is a shot of the collar installed before faucets.
Last, here is the pic that the pic in the upper corner is taken from. You can see the full drip trays and manifolds. I also now have a label holder that is connected via magnets to the top that holds a business card sized label for each beer (versus the masking tape label you see in the last pic).
Hope this helps. I stole a bunch of these ideas from everyone ... you're on the right path!
I don't have internal circulation (I do think it is a good idea) but I do have the dehumidifier ... wish I had it from the get-go ...
Dan
P.S. I will have to get you my spacing ... mine was driven by the drip trays though. FYI I used a chassis punch to get the holes in the stainless drip trays.
For wheels, I built a frame from angle iron and set the freezer inside. Be sure to leave a notch for the freezer drain plug (ask me how I know
For Temp I did the standard Ranco treatment. The temp probe goes into a gallon jug of water with a thermowell.
I did an external CO2 tank (I added to my rolling frame later) with multiple regulators to differing pressures.
My kegerator has 4 regulators and 4 manifolds. You can see the regs here and the manifolds here.
I made my collar out of 1" white melamine. Internally I used 1" aluminum angle for braces. I agree with Dr. Dually on getting flat surfaces. After ripping the collar on the table saw, I edge banded the collar. No need to insulate and no sealing issues. I put aluminum 1/4" dowels in the corners and drilled holes in the top of the chest. That is all that holds mine together ... no sealant, glue or other bracing ... just gravity (1" melamine is _HEAVY_). See the collar being assembled here. And here is a shot of the collar installed before faucets.
Last, here is the pic that the pic in the upper corner is taken from. You can see the full drip trays and manifolds. I also now have a label holder that is connected via magnets to the top that holds a business card sized label for each beer (versus the masking tape label you see in the last pic).
Hope this helps. I stole a bunch of these ideas from everyone ... you're on the right path!
I don't have internal circulation (I do think it is a good idea) but I do have the dehumidifier ... wish I had it from the get-go ...
Dan
P.S. I will have to get you my spacing ... mine was driven by the drip trays though. FYI I used a chassis punch to get the holes in the stainless drip trays.
Re: Chest freezer kegerator Do's & Don’ts
Brian
If you need table saw, chassis punch or other tools, contact me via PM
If you need table saw, chassis punch or other tools, contact me via PM
Chris aka Dr Dually
drdually@att.net
Life is tough. It is even tougher when you are stupid. John Wayne
Bottled and enjoying: Nada, zip
Kegged: English Brown, American Amber, Double Barrel Ale
Next up: Kolsch
drdually@att.net
Life is tough. It is even tougher when you are stupid. John Wayne
Bottled and enjoying: Nada, zip
Kegged: English Brown, American Amber, Double Barrel Ale
Next up: Kolsch
-
backyard brewer

- Posts: 3774
- Joined: Fri Feb 18, 2005 5:38 pm
- Location: Orange County, CA
- Contact:
Re: Chest freezer kegerator Do's & Don’ts
I'll also add that it's a god idea to seal all the internal sheet metal seams with silicone caulking to prevent them from rusting. THe chest freezer will generate a lot of condensation and not properly sealed, the seams will rust. Just seal the wall to floor joint and the wall seam.
 Become a Brewer's Hardware Fan on Facebook!
Re: Chest freezer kegerator Do's & Don’ts
+1 on the beer line length, I think I ended up 7' or 8' on mine and they work much better than the 5' I used to have.bwarbiany wrote: #3: Run longer beer line than you think you need. Most online calculators tell you that you only need 5' for a properly balanced draw. I don't believe it. Plan on starting with at least 10' per tap (more if you can). You can always cut it down. But you want to avoid having pours full of foam.
"I feel sorry for people who don't drink. When they wake up in the morning, that's as good as they're going to feel all day!"
~Frank Sinatra
~Frank Sinatra

Re: Chest freezer kegerator Do's & Don’ts
One cool design I saw set it up so the collar was hinged and raised taking most of beer and co2 lines out of the way with it.

Re: Chest freezer kegerator Do's & Don’ts
Here's mine:

I added drip trays (Home Depot painter's mud pans) held on with HDD magnets. Works appreciably well.
As you can see, I built a simple 2x4 frame and put it on casters. When I have parties I roll it out to the backyard and it works out rather nicely.
One thing I did that I think really ties the look together is that my collar is 2x8 pine, but I used 1/2"x10 red oak on the outside of the collar. It gives it a nicer look IMHO than painting, and because I used a wider piece of wood than the collar itself, it hides the seam between the collar and the freezer.
FYI for the fans, I used a 12V wall adapter rather than a PC power supply. Given that the PC power supply is built to handle a couple hundred watts, it seems overkill for the application.
Edit -- The taps are offset to the left because there's room for 6 kegs internally -- I plan eventually to add a 6th tap, so all of the spacing is set up to have room for that tap.
Brad
Re: Chest freezer kegerator Do's & Don’ts
Northern Brewer has a video on building keezers
Hope this helps
http://www.northernbrewer.com/connect/2 ... r-freezer/
Hope this helps
http://www.northernbrewer.com/connect/2 ... r-freezer/
Chris aka Dr Dually
drdually@att.net
Life is tough. It is even tougher when you are stupid. John Wayne
Bottled and enjoying: Nada, zip
Kegged: English Brown, American Amber, Double Barrel Ale
Next up: Kolsch
drdually@att.net
Life is tough. It is even tougher when you are stupid. John Wayne
Bottled and enjoying: Nada, zip
Kegged: English Brown, American Amber, Double Barrel Ale
Next up: Kolsch
-
BARL Brewing
- Posts: 157
- Joined: Mon Mar 08, 2010 10:49 pm
- Location: Corona, Ca
Re: Chest freezer kegerator Do's & Don’ts
Thanks for all the good advice so far. I hadn’t even considered a fan or dehumidifier.
-Will that eliminate condensation?
-Will condensation build up regardless or only if the keezer isn’t sealed well?
I had an idea to attempt to allow the collar to seal on the body of the freezer when the lid closes. I may make an inverted U shaped collar with a few inch recess and gasket inside the U to get a tight seal. Not sure if that’s even necessary or how that may work with all four sides because of the angle the lid swings closed, it may only work with three sides?
I did today get my zymurgy, which has an article on “Constructing a Keezer” (good timing)
I’ll fire off any updates or questions as they come up?

Re: Chest freezer kegerator Do's & Don’ts
Condensation will build up no matter how good the seal, to get rid of it, i use an EvaDry E500, found http://www.amazon.com/Eva-dry-E-500-Ren ... B000H0XFD2
The great thing is that once it's soaked, you just plug it in to an outlet for a few hours and it's good to go again.
The great thing is that once it's soaked, you just plug it in to an outlet for a few hours and it's good to go again.
Brewing soon: KtG
Primary :
Secondary: Sucaba clone (on oak soaked in EC12)
Kegs: Kate the just OK, English SMASH
Gals brewed '11: 50
Gals brewed '12: 50
Primary :
Secondary: Sucaba clone (on oak soaked in EC12)
Kegs: Kate the just OK, English SMASH
Gals brewed '11: 50
Gals brewed '12: 50
-
StarRaptor

- Posts: 204
- Joined: Sat Jul 17, 2010 8:18 am
- Location: Orange, CA
Re: Chest freezer kegerator Do's & Don’ts
I put a step by step guide up for mine on my "site" with some notes --> http://snbbrewing.blogspot.com/p/crate.html
